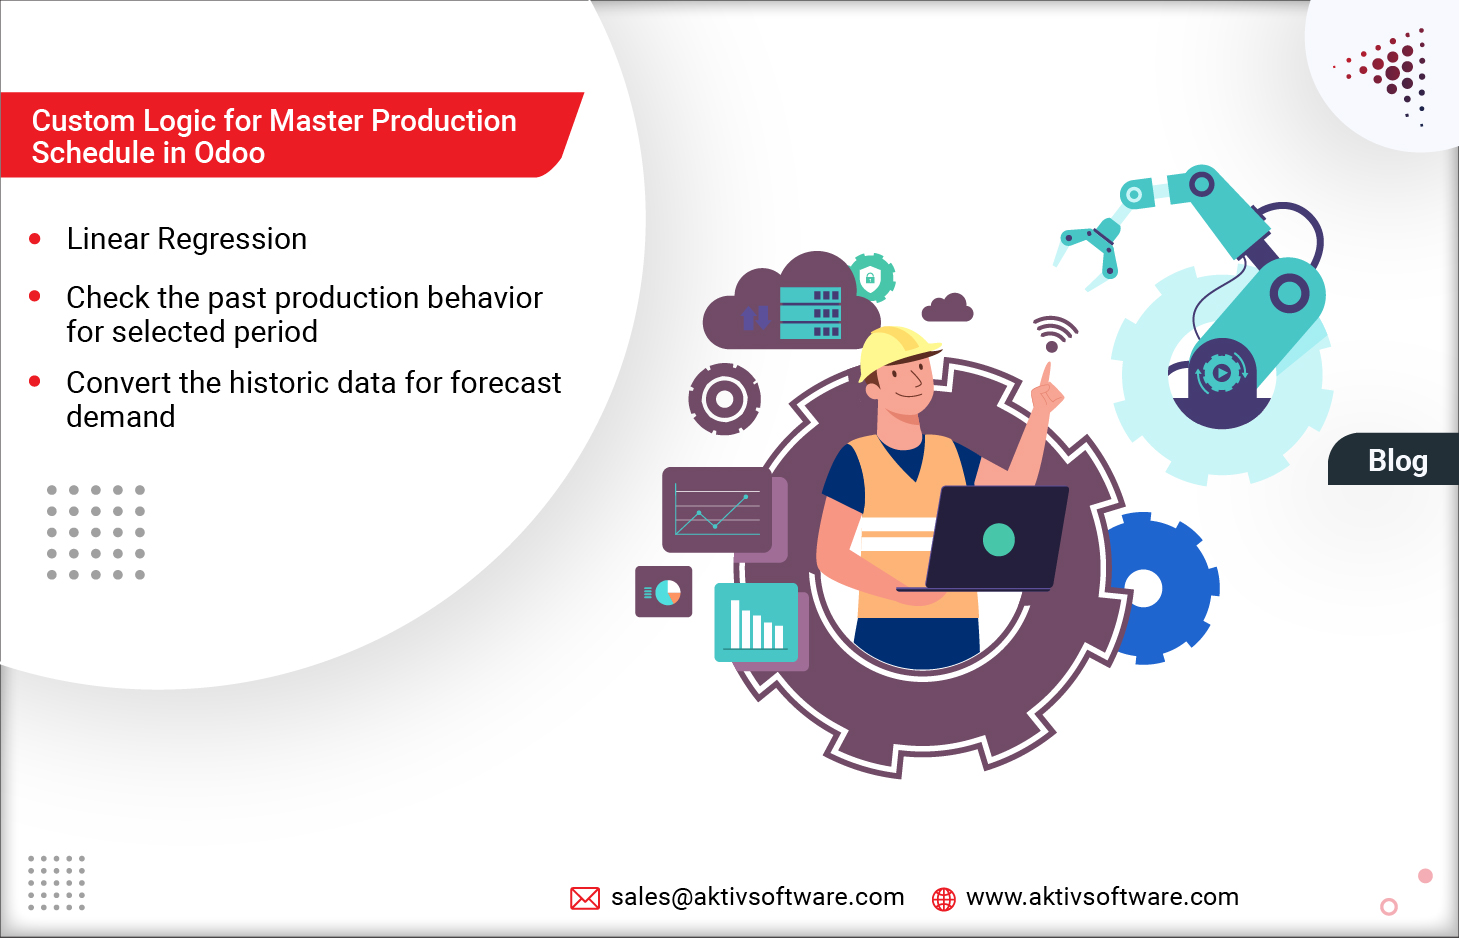
The Master Production Schedule in Odoo ERP efficiently lets you plan your production based on your demand forecast. It comes as a big relief for the manufacturers dealing with bulk production.
Generally, when users enable the Odoo MPS function, they can set a time range as Monthly/Weekly/Daily to derive the forecast demand.
The only hurdle was that if the user wanted to derive forecast demand based on the historic data for a custom period like fifteen days of the month or three weeks, it wasn’t possible in default Odoo flow.
How to select a custom period to forecast in Odoo 14 MPS?
Odoo 14 MPS doesn’t have the facility of fetching forecast demand based on a custom period to forecast, so we customized the flow wherein users can set custom- “Period to Forecast” and “Historic Data for Forecasting” as per their requirement.
Period to Forecast: the future duration you want the production demand.
Historic Data for forecasting: data that reveals the actual production demand for the selected timeline from the past.
Before moving ahead to the functionality, let’s get the configuration right:
- Go to Master Production Schedule in the Odoo Manufacturing module.
- Select the time frame for MPS that is available by default in Odoo.
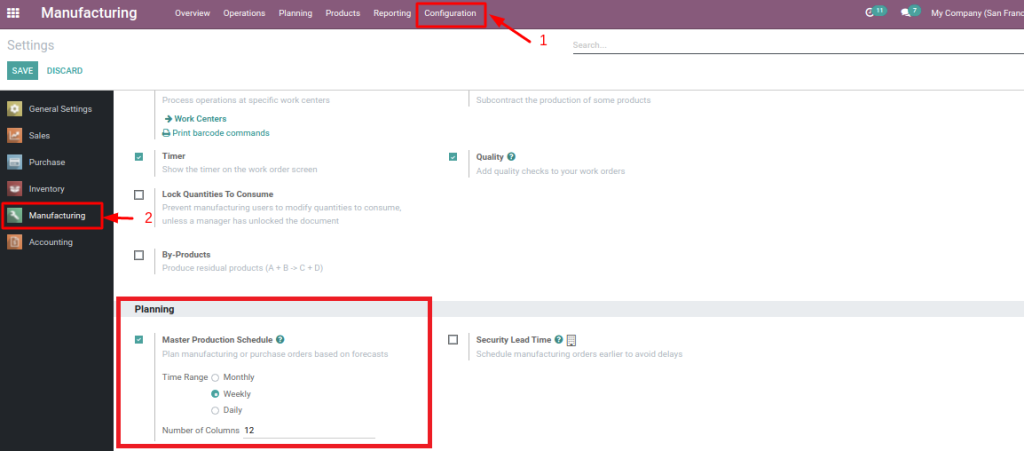
- Based on the selected time frame, i.e., “Weekly” in the given case, one can set a custom period to forecast in the next step.
Checkbox for: “Period to forecast” and “Historic Data for Forecasting” is available under “Forecasted Demand on MPS.”
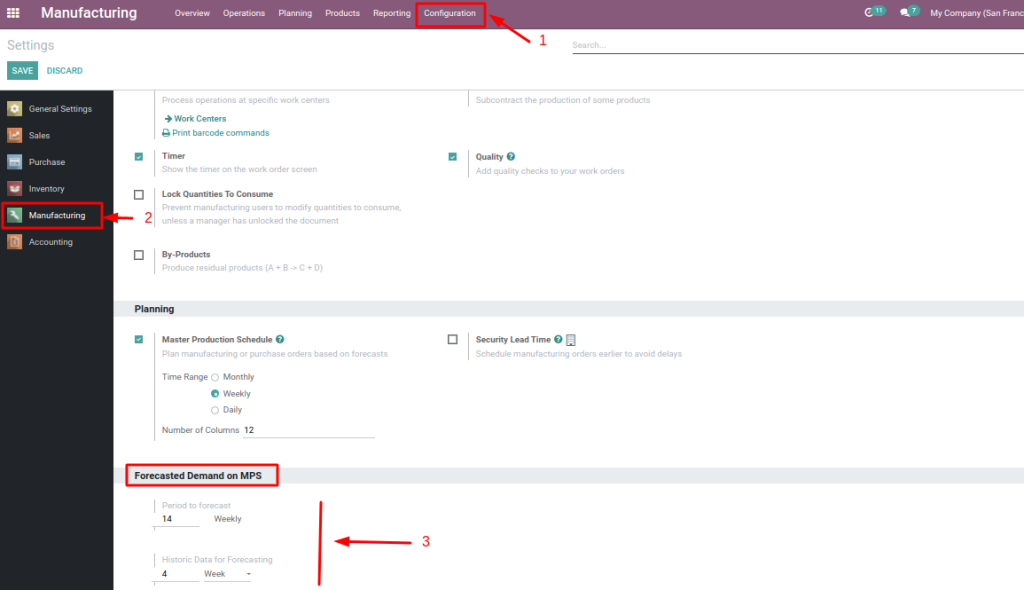
- As per the selected MPS, i.e., weekly, users can set custom weeks for both periods to forecast and historic data for forecasting.
- In the given case, let’s say a user wants to generate forecast demand for the upcoming 14 weeks as compared to the historic data of 4 weeks.
Restraints Validation on the input field:
- Field: For Historic Data field value cannot be smaller than res.config.settings.manufacturing_period (days < weeks < months)
- When Historic Data and Manufacturing Period = days, then: Historic Data cannot be smaller than the Period to forecast.
How does the Customization work for the Production Schedule in Odoo?
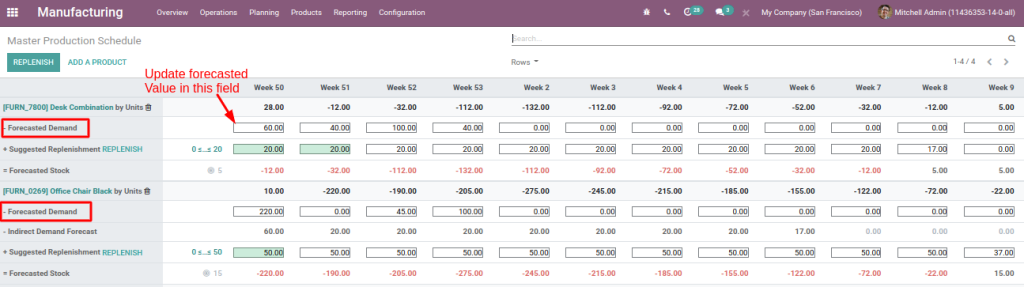
An automated calculation will update the MPS with actual forecasted demand as soon as the user enters the historic data for forecasting and the period to forecast.
Step 1: Go to the Odoo Manufacturing App and Planning Menu

Step 2: A new Button, “Calculate Forecast,” could be seen on the Master Production Schedule view.

Step 3: Upon trigger, a wizard will pop up: with two options: “Discard” and “Calculate forecast.”
- “Discard” will return to view
- “Calculate forecast” will trigger the calculation

Linear Regression method to calculate the forecasted demand in Odoo 14 MPS:
When the “Calculate forecast” button is triggered, it will figure out the below logic:
With the settings configured in the “Period to forecast,” system will calculate the forecast period-
- Forecast Number –> sets how many periods need to be forecasted
- Goal: have a list of dates to forecast.
- Calculate history_start_date: today minus the range defined in “Historic data for forecasting.”
- Iterate loop for every product which is available in the master production schedule.
- For each product, iterate over all forecast_dates (today’s date minus Historic data for forecasting from configuration).
- For each forecast_date check total consumption of product per day where date.iso_weekday = forecast_date.iso_weekday and date >= history_start_date (For setting “days” only)
In short, the custom logic will check the past sale orders of selected products for a given duration between the start date and end date and stock. Move which are created during that period and prepare the dataset which shows day/week/month wise product quantity.
Put values that we have fetched from historical data and quantity into a list and use linear regression to find the value for the next dataset like below:
E.g: [{‘forecast_date’: total consumption}]
[{’08-12-2021′ : 10}, {’09-12-2021′ : 10}, {’10-12-2021′ : 10}, {’11-12-2021′ : 10}, {’12-12-2021′ : 10}, {’13-12-2021′ : 10}, {’14-12-2021′ : 10},]
The calculated value is then set as “Forecasted Demand” for the product on this Forecast Date.
Note: For different time ranges configured in the settings, we have used different ways of calculation:
Historic: days/Forecast days:
- Total consumption on same weekdays
- Each new forecast date has completed a new list of data values
- When forecasting more than one week: forecasted demand values are counted as data points for linear regression
Historic: weeks/Forecast days:
- Same as Days/Days
Historic: Weeks/Forecast: Weeks:
Forecast_dates = weeks; this week is number one
- One dataset of history values
- Total consumption over whole weeks as data values
- Forecasted values become part of the dataset for the following value to forecast
Historic: Months/Forecast: Days:
- Same as other day calculation
Historic: Months/Forecast: Weeks:
- Same as Weeks/weeks
Historic: Months/Forecast: Months
- Forecast_dates = months
- One dataset of history values
- Total consumption over a whole month as data values
- Forecasted values become part of the dataset for the next value to forecast
Schedule a live demo with our technical experts and learn more about the custom feature. Our team comprises all-rounding experts in Odoo apps; submit your requirements, if any.